Professional Installation Tips
Installation Overview
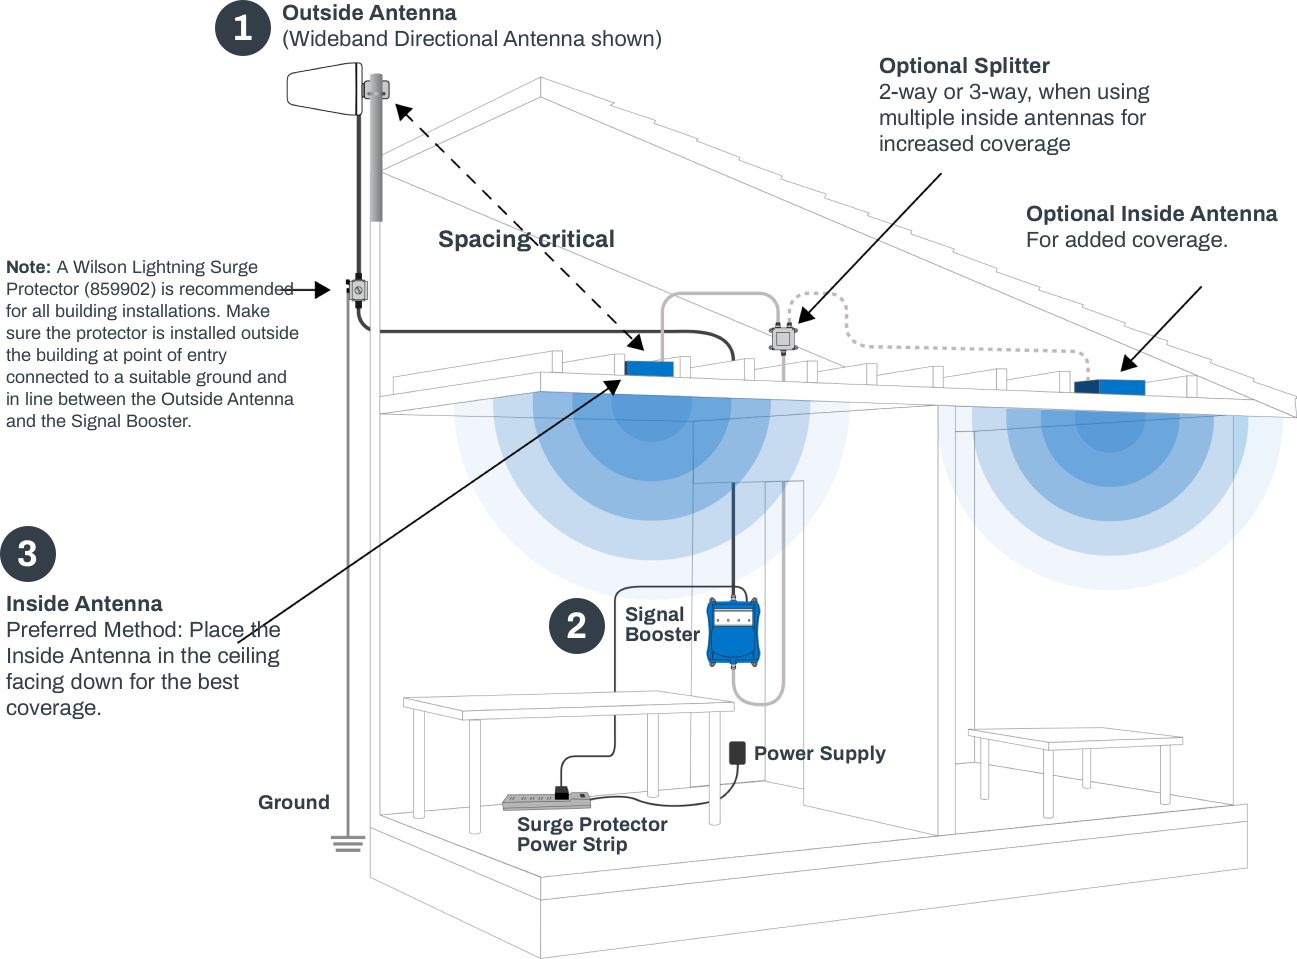
Installing a WilsonPro Signal Booster kit system is fairly straightforward, but will require running cable from the roof or elevated location into the building, as well as potentially drilling and screwing in components.
Additionally, before you begin, we recommend that you start with a soft installation, where you don't permanently mount components, drill holes or finalize cable runs until you're sure that the system is performing to the level that you would like. Once you've tested out antenna and component locations, and are satisfied with the results, then you can go ahead and permanently install everything. Finally, read through the entire set of installation instructions both here and in the included manual before beginning, and feel free to call us with any questions before you proceed.

We'll start the installation from the roof and work our way into the building. First, start by determining the part of the roof that receives the best signal, as we'll want to locate the directional antenna there and ideally aim it away from the building (and not back over the roof). Once you've identified the portion of the roof which is best, locate the vertical pole which you'll be mounting the yagi directional antenna as high up on the roof as possible. Attach the directional antenna and temporarily aim it away from the building. Run the 15 meter cable from the antenna into the building.
Once the cable is inside the building, run the cable to the area where you plan to locate the amplifier. Attach the included lightning protector and then connect the 1.5 meter cable to the "Outside Antenna" port of the amplifier. Connect the 10 meter cable to the "Inside Port" on the other side of the amplifier, and run it to the location where you plan to mount the inside antenna. Attach the antenna and install either on the ceiling facing downwards, or on the wall facing across the area that you want to cover with boosted signal.
Once all of the components are connected, power on the amplifier by plugging it in. As it's powering up, you should see the lights flashing, and then check to see that they turn solid green. If the lights are not solid green, check out the portion of the owners manual that discusses the indicator lights to find out what they mean. Of, you can always contact us for help.
Directional antennas must be aimed for best results. When aiming and when mounting the antenna, make sure that it is parallel with the ground, do not aim it up at the sky or down at the ground. Start with the antenna high on the roof pointed in one direction. Turn on the system and have a person inside stand 3 meters in front of the inside antenna and take a signal reading with their phone in field test mode. Rotate the outside antenna 45 degrees (1/8th of the way around) and then pause for 60 seconds. After the pause, the person inside should take another signal reading from exactly the same spot, and then you can repeat the process. After you've gone all the way around, mount the antenna facing in the direction with the strongest signal (decibel signal reading will be closest to 0). If possible, also mount the antenna on that side of the home or office so that it's pointing away from the building and not over the building.
The included manual is very helpful and we recommend reading through it before beginning the installation. If you run into any issues, feel free to contact us for help.
Our installation teams are available for commercial installations
